

Custom domains
Custom domains help elevate your brand and make your clients feel secure when they are in your portal. If your website is{companyName}.com, with a custom domain you can set up portal.{companyName}.com. The word “portal” can be replaced with a term of your choice. We recommend that you set up a custom domain before inviting all of your clients; otherwise they will need to log in again.
Connect a custom domain
- Navigate to Settings > Domains.
- Enter your domain.
- Select your registrar (hosting provider) from the dropdown. For example, select GoDaddy if GoDaddy hosts your website.
- Enter the word you would like to use for your subdomain. Many users choose portal, but it can be any single word of your choosing with no special characters.
- You should only enter the subdomain, not the full URL. The subdomain is noted in bold: portal.
{yourDomain}.com, so you would only enter portal in the subdomain input. - This can also be another subdomain of your choice. For example, if you want your custom domain to be clients.
{yourDomain}.com, you would enter clients in the subdomain input.
- You should only enter the subdomain, not the full URL. The subdomain is noted in bold: portal.
- You must log into your registrar (hosting provider) and add the CNAME record we provide after setting up your domain in Assembly. This step is important and required for your domain to verify.
- For example, if GoDaddy hosts your website, you will need to log into GoDaddy and add the records there. We’ve listed links to instructions on adding records for popular hosting providers below.
- Wait between 5 minutes and 24 hours for the setup to be complete.
Instructions for adding records to popular hosting providers
- GoDaddy
- Squarespace
- Wix
- Namecheap
- Cloudflare (be sure to disable the proxy setting [orange cloud] when adding the record)
- Bluehost
- HostGator
Custom email domains
Custom email domains help elevate your brand and ensure that email notifications sent to clients don’t end up in the spam folder. If your website is{yourDomain}.com, with a custom email domain you can set up email notifications to be sent from notifications@{yourDomain}.com.
Connect a custom email domain
- Navigate to Settings > Domains.
- Enter the required information in the custom email domain section. When asked for your domain, enter just your root domain, e.g.
yourdomain.com. - You must log into your registrar (hosting provider) and add the new records. See above for instructions on adding records to popular hosting providers.
- Be sure to enter all records provided by us when entering your information. This includes 3 CNAME records, 2 MX records, and 1 TXT record. You may need to scroll down to see all of them.
- For the MX records, the 10 in the value is the priority. Some registrars have a separate column for this, and the value will be the rest of the record (beginning with
feedback.smtp…orinbound.smtp...). - The Name column shown in Assembly may also be called Host, Host Name, or Alias depending on your DNS registrar. Similarly, the Value column is sometimes referred to as Data.
- Wait between 5 minutes and 72 hours for the setup to be complete. Until setup is successful, we will keep using the default email notification sender email.
Wix users
If you’re using Wix as your hosting provider, unfortunately they do not allow custom email domains for subdomains, meaning that connecting a custom email for a domain hosted by Wix is not possible. You can find the explanation from Wix and upvote the feature request in the Wix community here. Custom web domains will still work with Wix, however.Changing your custom domain
If your domain changes, or if you wish to change your subdomain, you can update your domain in Settings > Domains.- If you have a custom email domain, you will need to delete this connection first. To do this, go to Settings > Domains, click the three dots to the right of your custom email domain, and select Delete. You can reconnect this later.
- In Settings > Domains, click the three dots to the right of your custom domain, and select Delete.
- Give the system some time for the records to be removed. We recommend waiting about 15-30 minutes before moving on to the next step.
- Go to your DNS registrar and delete the CNAME record you added for the previous custom domain. It should be your old subdomain as the name, and
secure.assembly.comas the value. - To ensure that reconnection goes smoothly, wait another 15-30 minutes before reconnecting your new custom domain in the next step.
- Go to Settings > Domains in your portal and reconnect the custom domain. Enter your base domain (
example.com), select your DNS registrar, and enter your preferred subdomain. - Once you’ve entered the correct information, you’ll receive your new CNAME record.
- Go back to your DNS registrar and add the new CNAME record.
- Once this is entered, it will take time for the records to propagate. Usually this happens within an hour, but can take up to 24 hours.
- After you see an active status for your custom web domain, you can continue to reconnect your custom email domain. Be sure to wait until your custom domain is active before reconnecting your custom email domain.
Troubleshooting custom domains
Ensure the information added to Assembly is correct
When setting up your custom domain, verify that the records match the example shown in the image below. Please note that you must have a registered domain to create a custom domain in Assembly.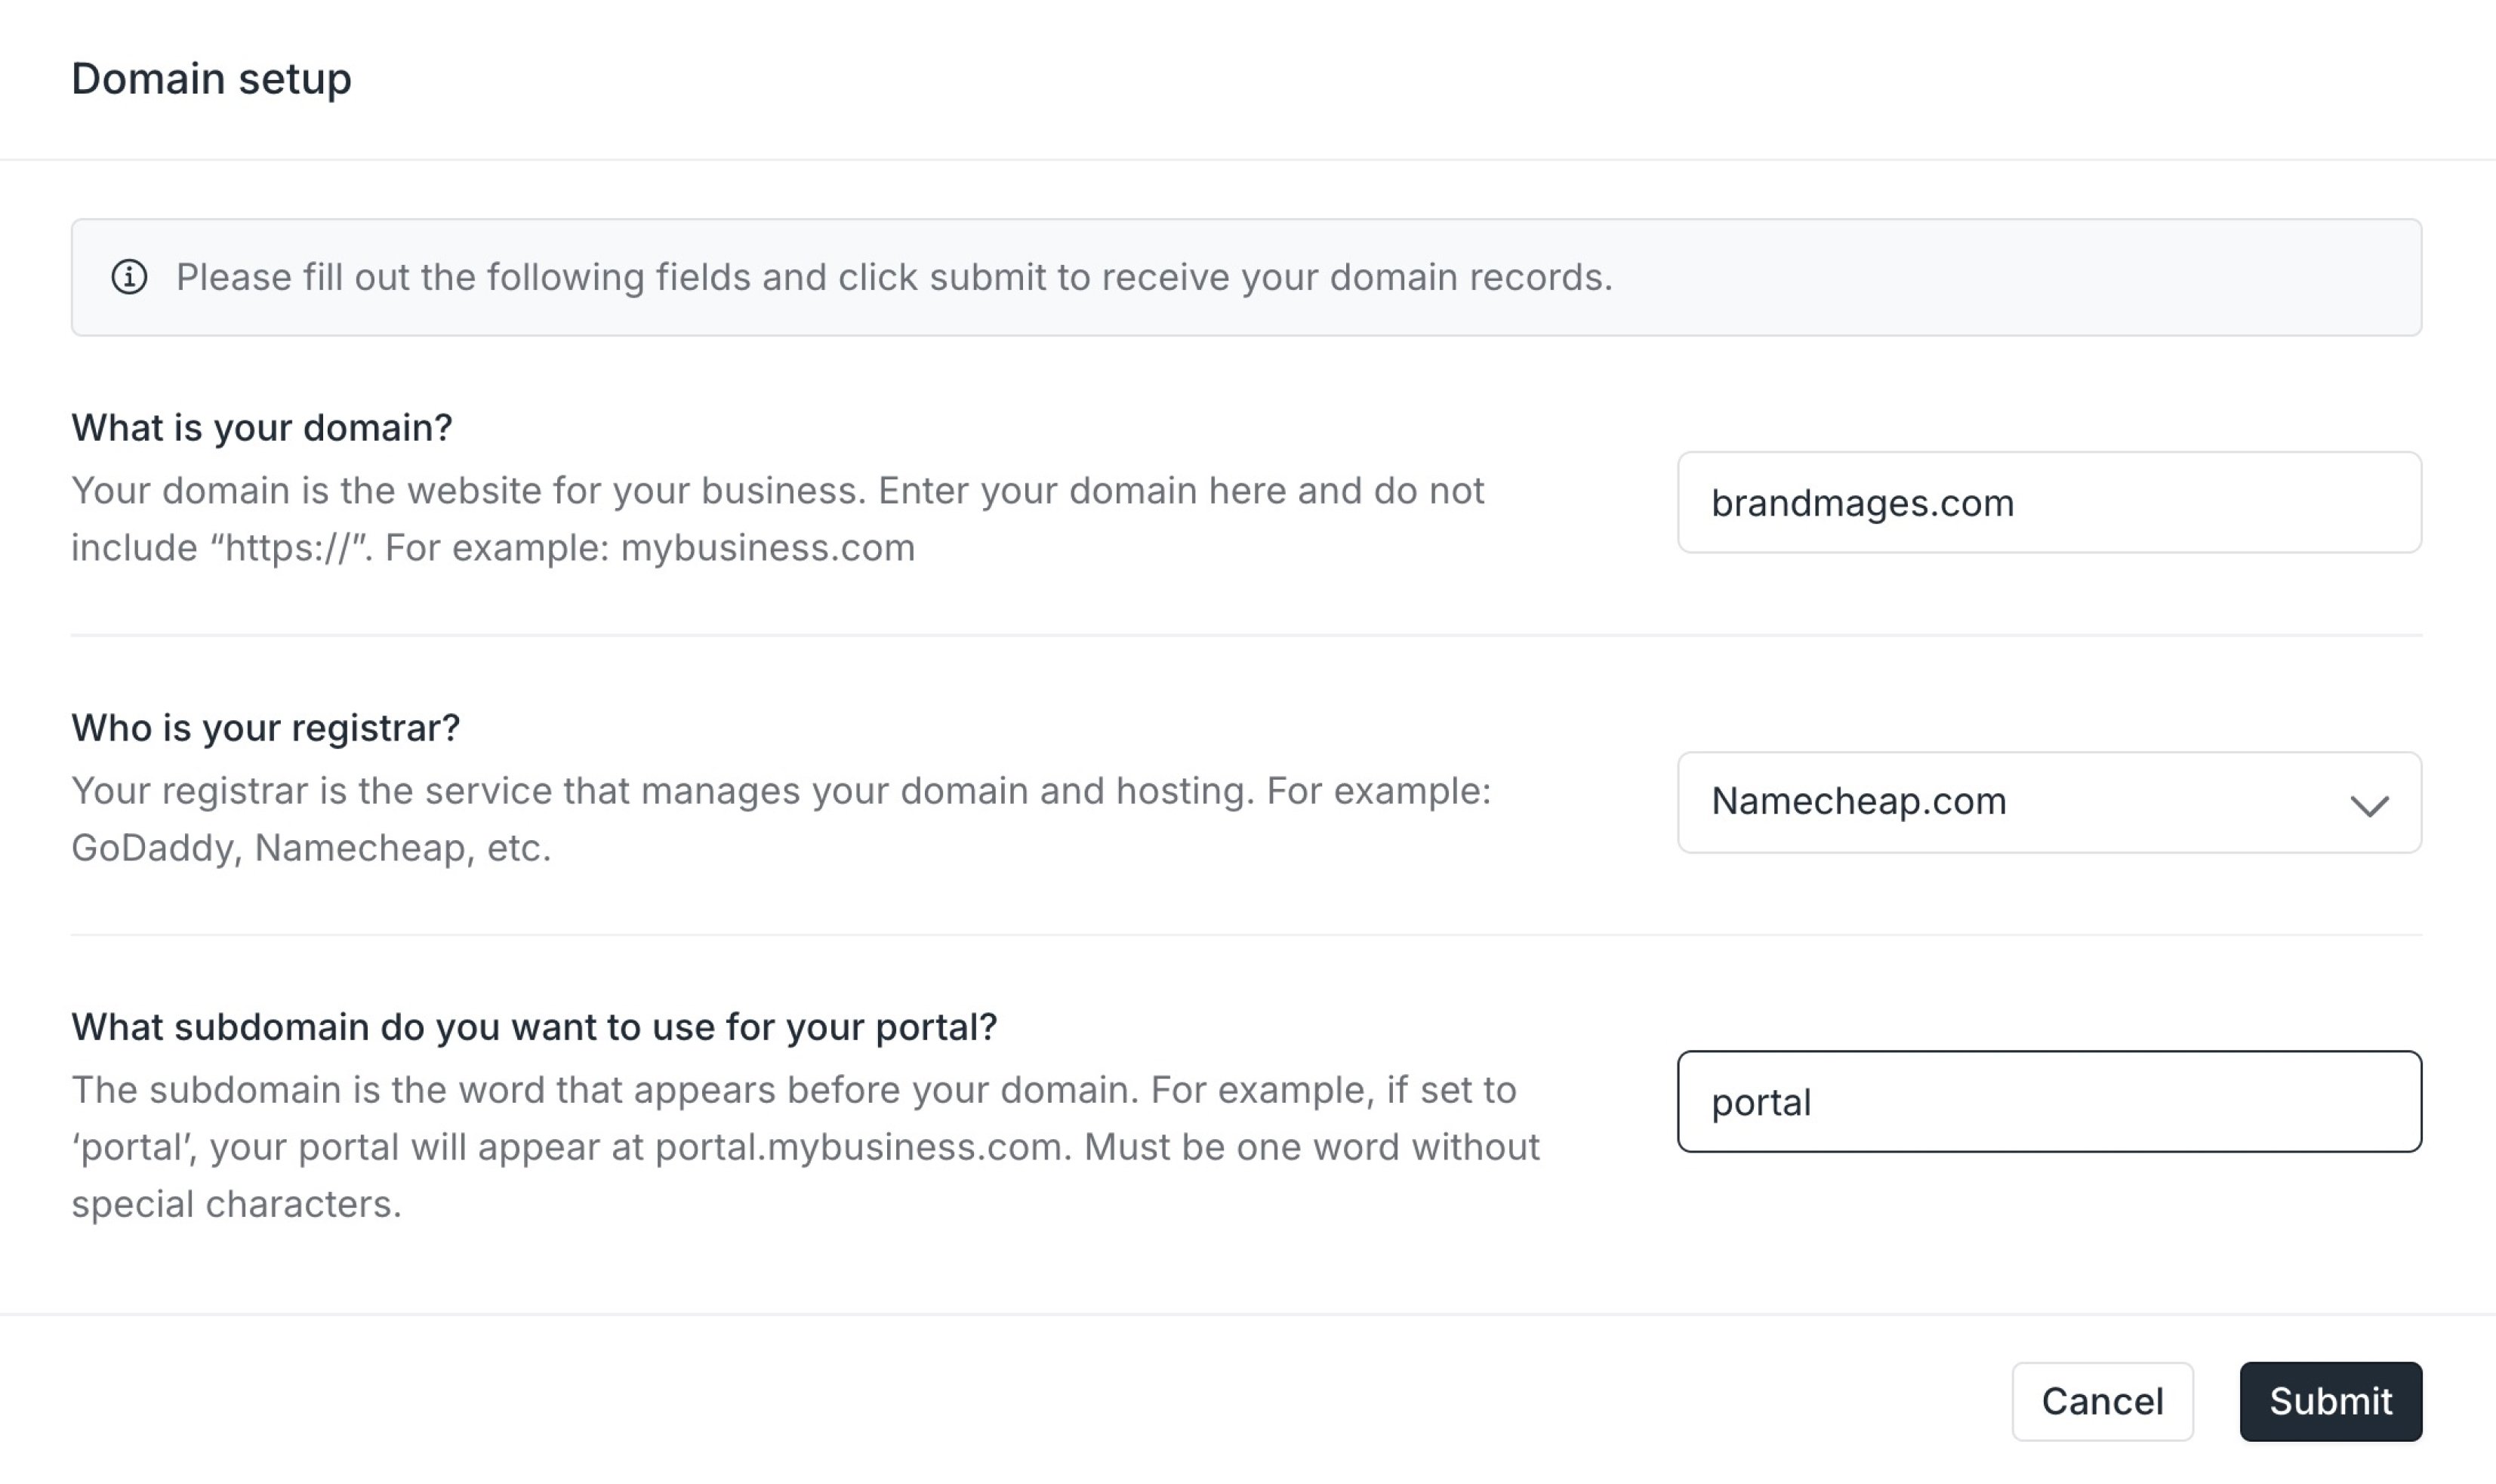
Many users opt for portal as their subdomain, but it can be any single word of your choosing without special characters. Remember to enter only the subdomain, not the full URL.
Ensure you have entered your records into the registrar
After setting up the domain in Assembly, you need to input the records provided by Assembly into your registrar (the site that hosts your business’s domain).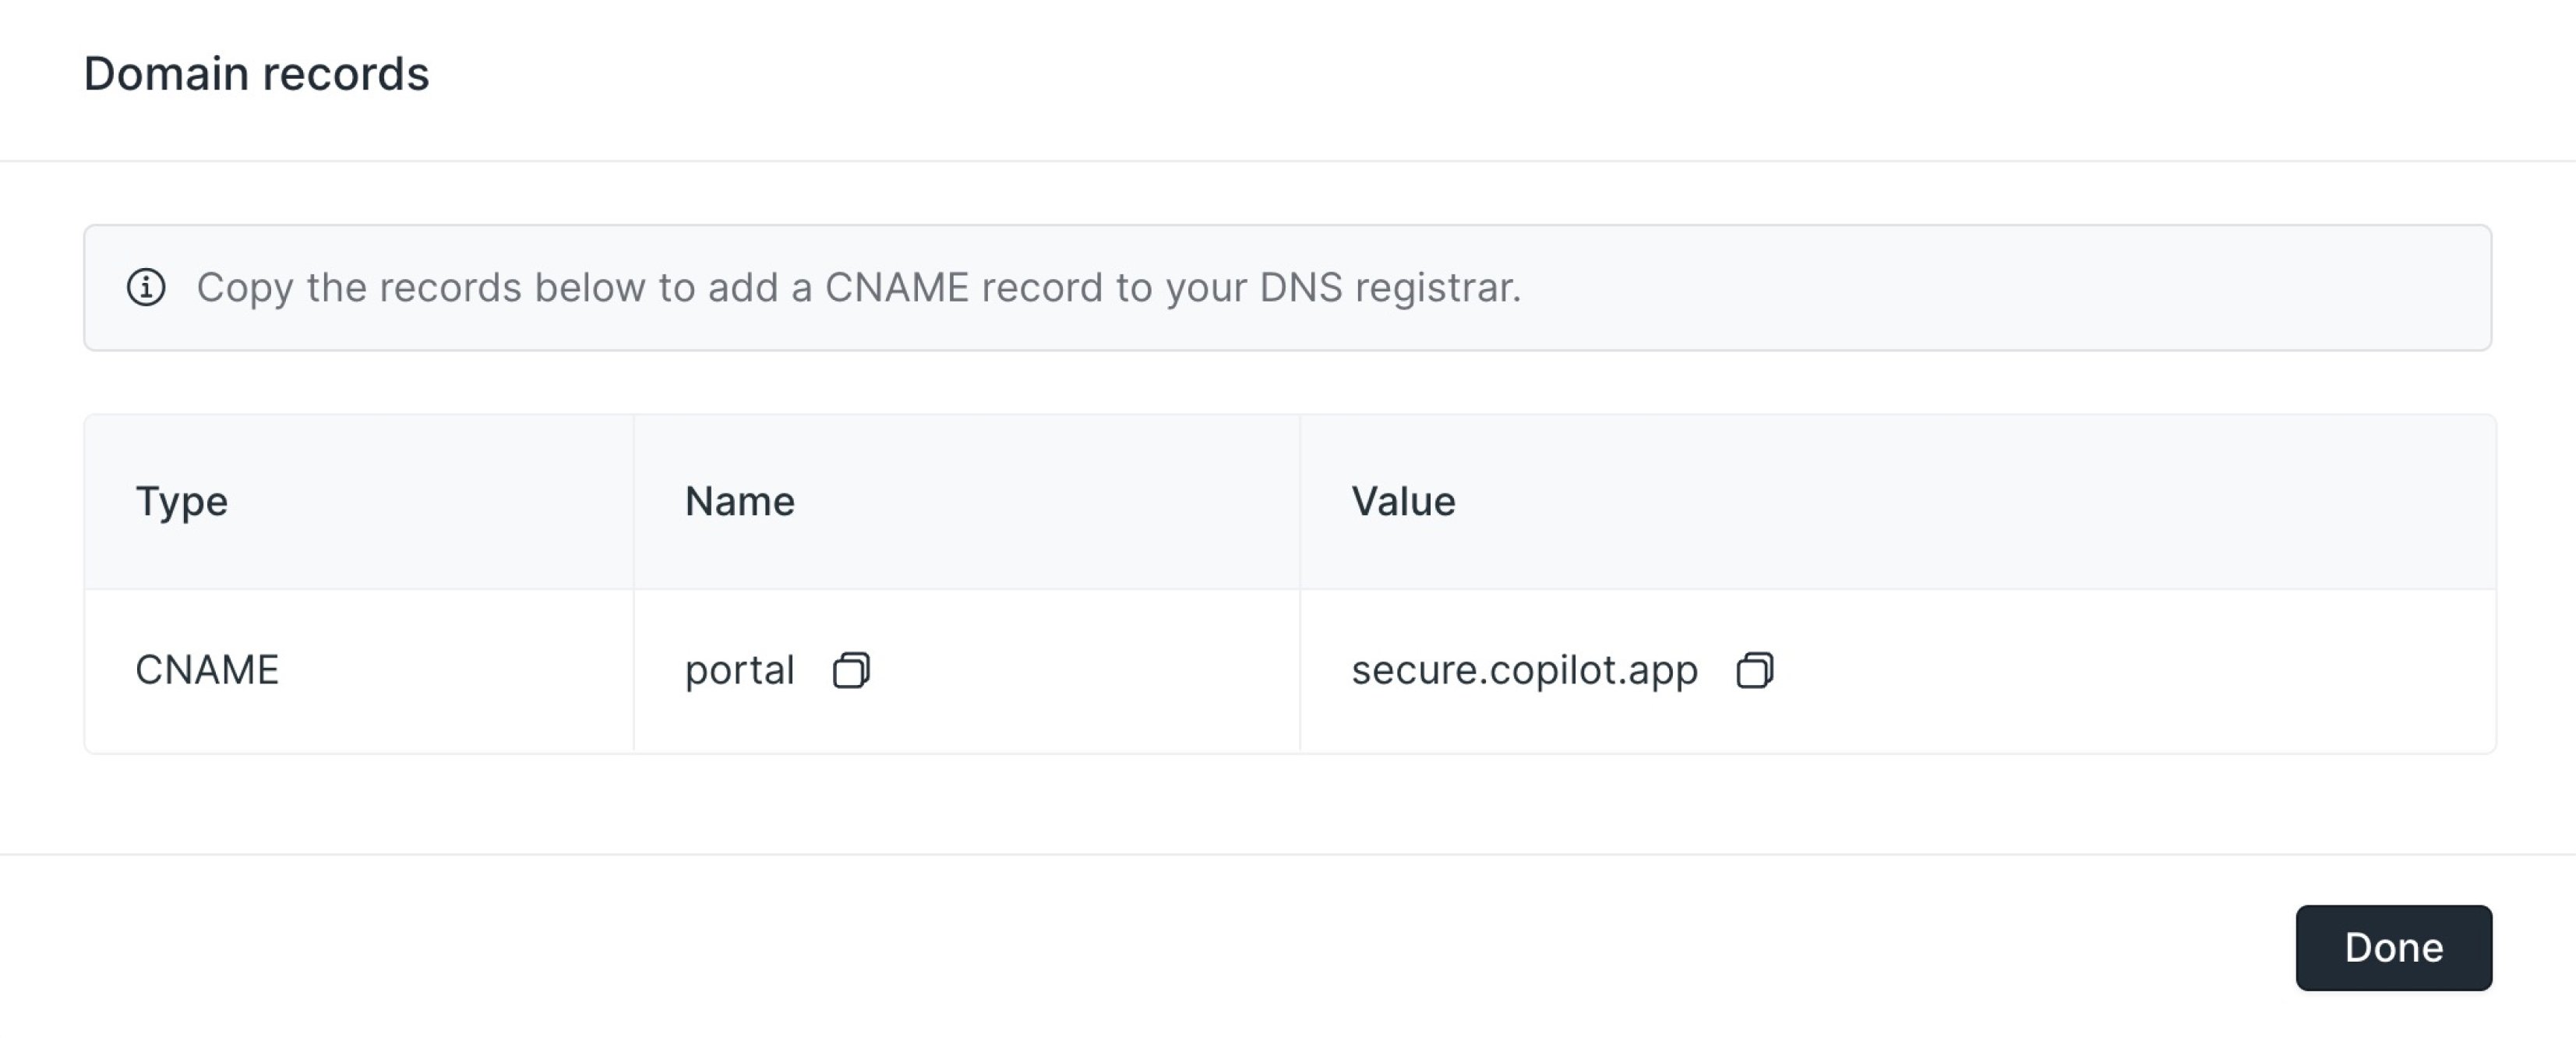
The name field should be the subdomain you added during the domain setup.
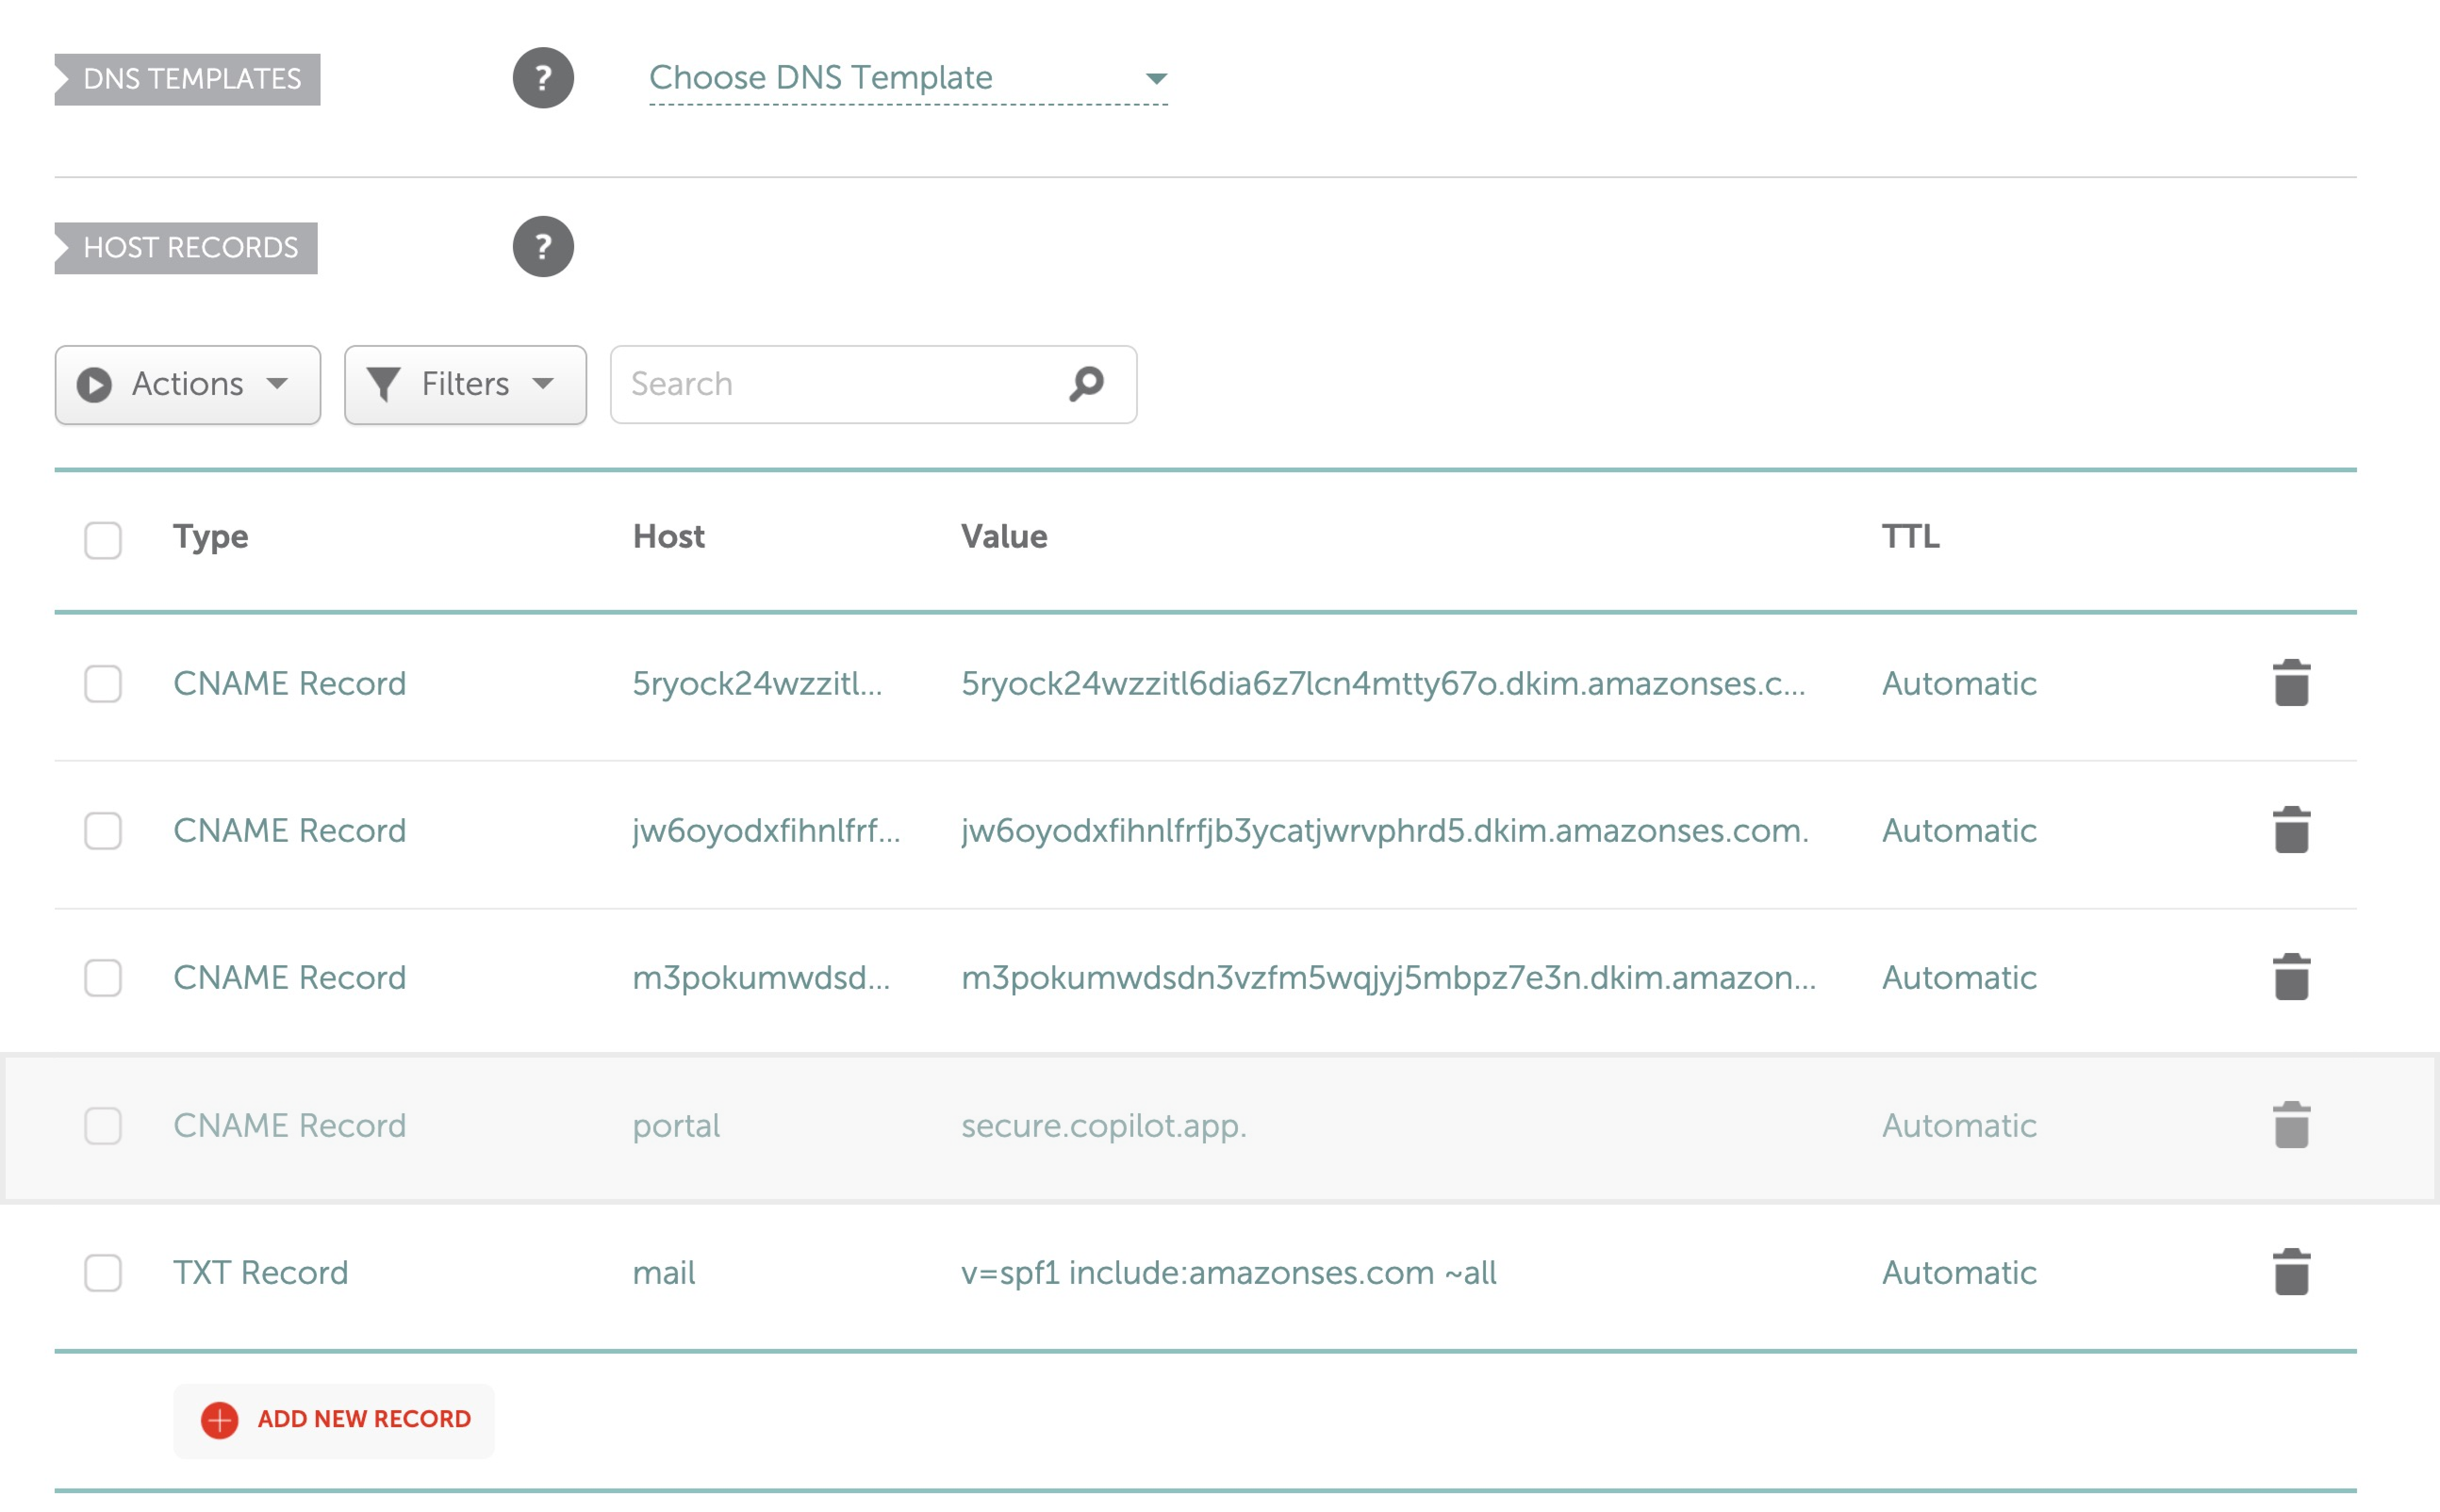
The registrar in this example is namecheap.com. Other registrars may look slightly different, but the process is generally the same.
Why can’t I change my custom web domain?
Occasionally our customers experience issues when trying to change a custom web domain that they had previously connected. In most cases, this is due to a custom email domain also being connected. You will need to disconnect any custom email domains before updating the custom web domain. Then, to change the custom web domain, the previous web domain must be disconnected before adding a new web domain.Custom web and email domains must match. For example, if your custom web domain is set as companyA.com, the custom email domain must also be @companyA.com.
Advanced troubleshooting
To further verify if the records you entered in your registrar are correct, you can use the Google Admin Toolbox to check if the CNAME is pointing to the correct target:secure.assembly.com.
Here are the steps to do this:
- Go to https://toolbox.googleapps.com/apps/dig/#CNAME/.
- Type your portal URL where it says “Name.”
- If the records you entered in the registrar are correct, the CNAME will propagate with the correct target,
secure.assembly.app, as shown in the image below. - If it says “Record not found!” it means the CNAME is not pointing to the right place. In this case, recheck the records you added in your registrar.
Troubleshooting custom email domains
Ensure the information added to Assembly is correct
When setting up your custom email domain, verify that the records match the example shown in the image below. Please note that you must have a custom domain in Assembly to create a custom email domain.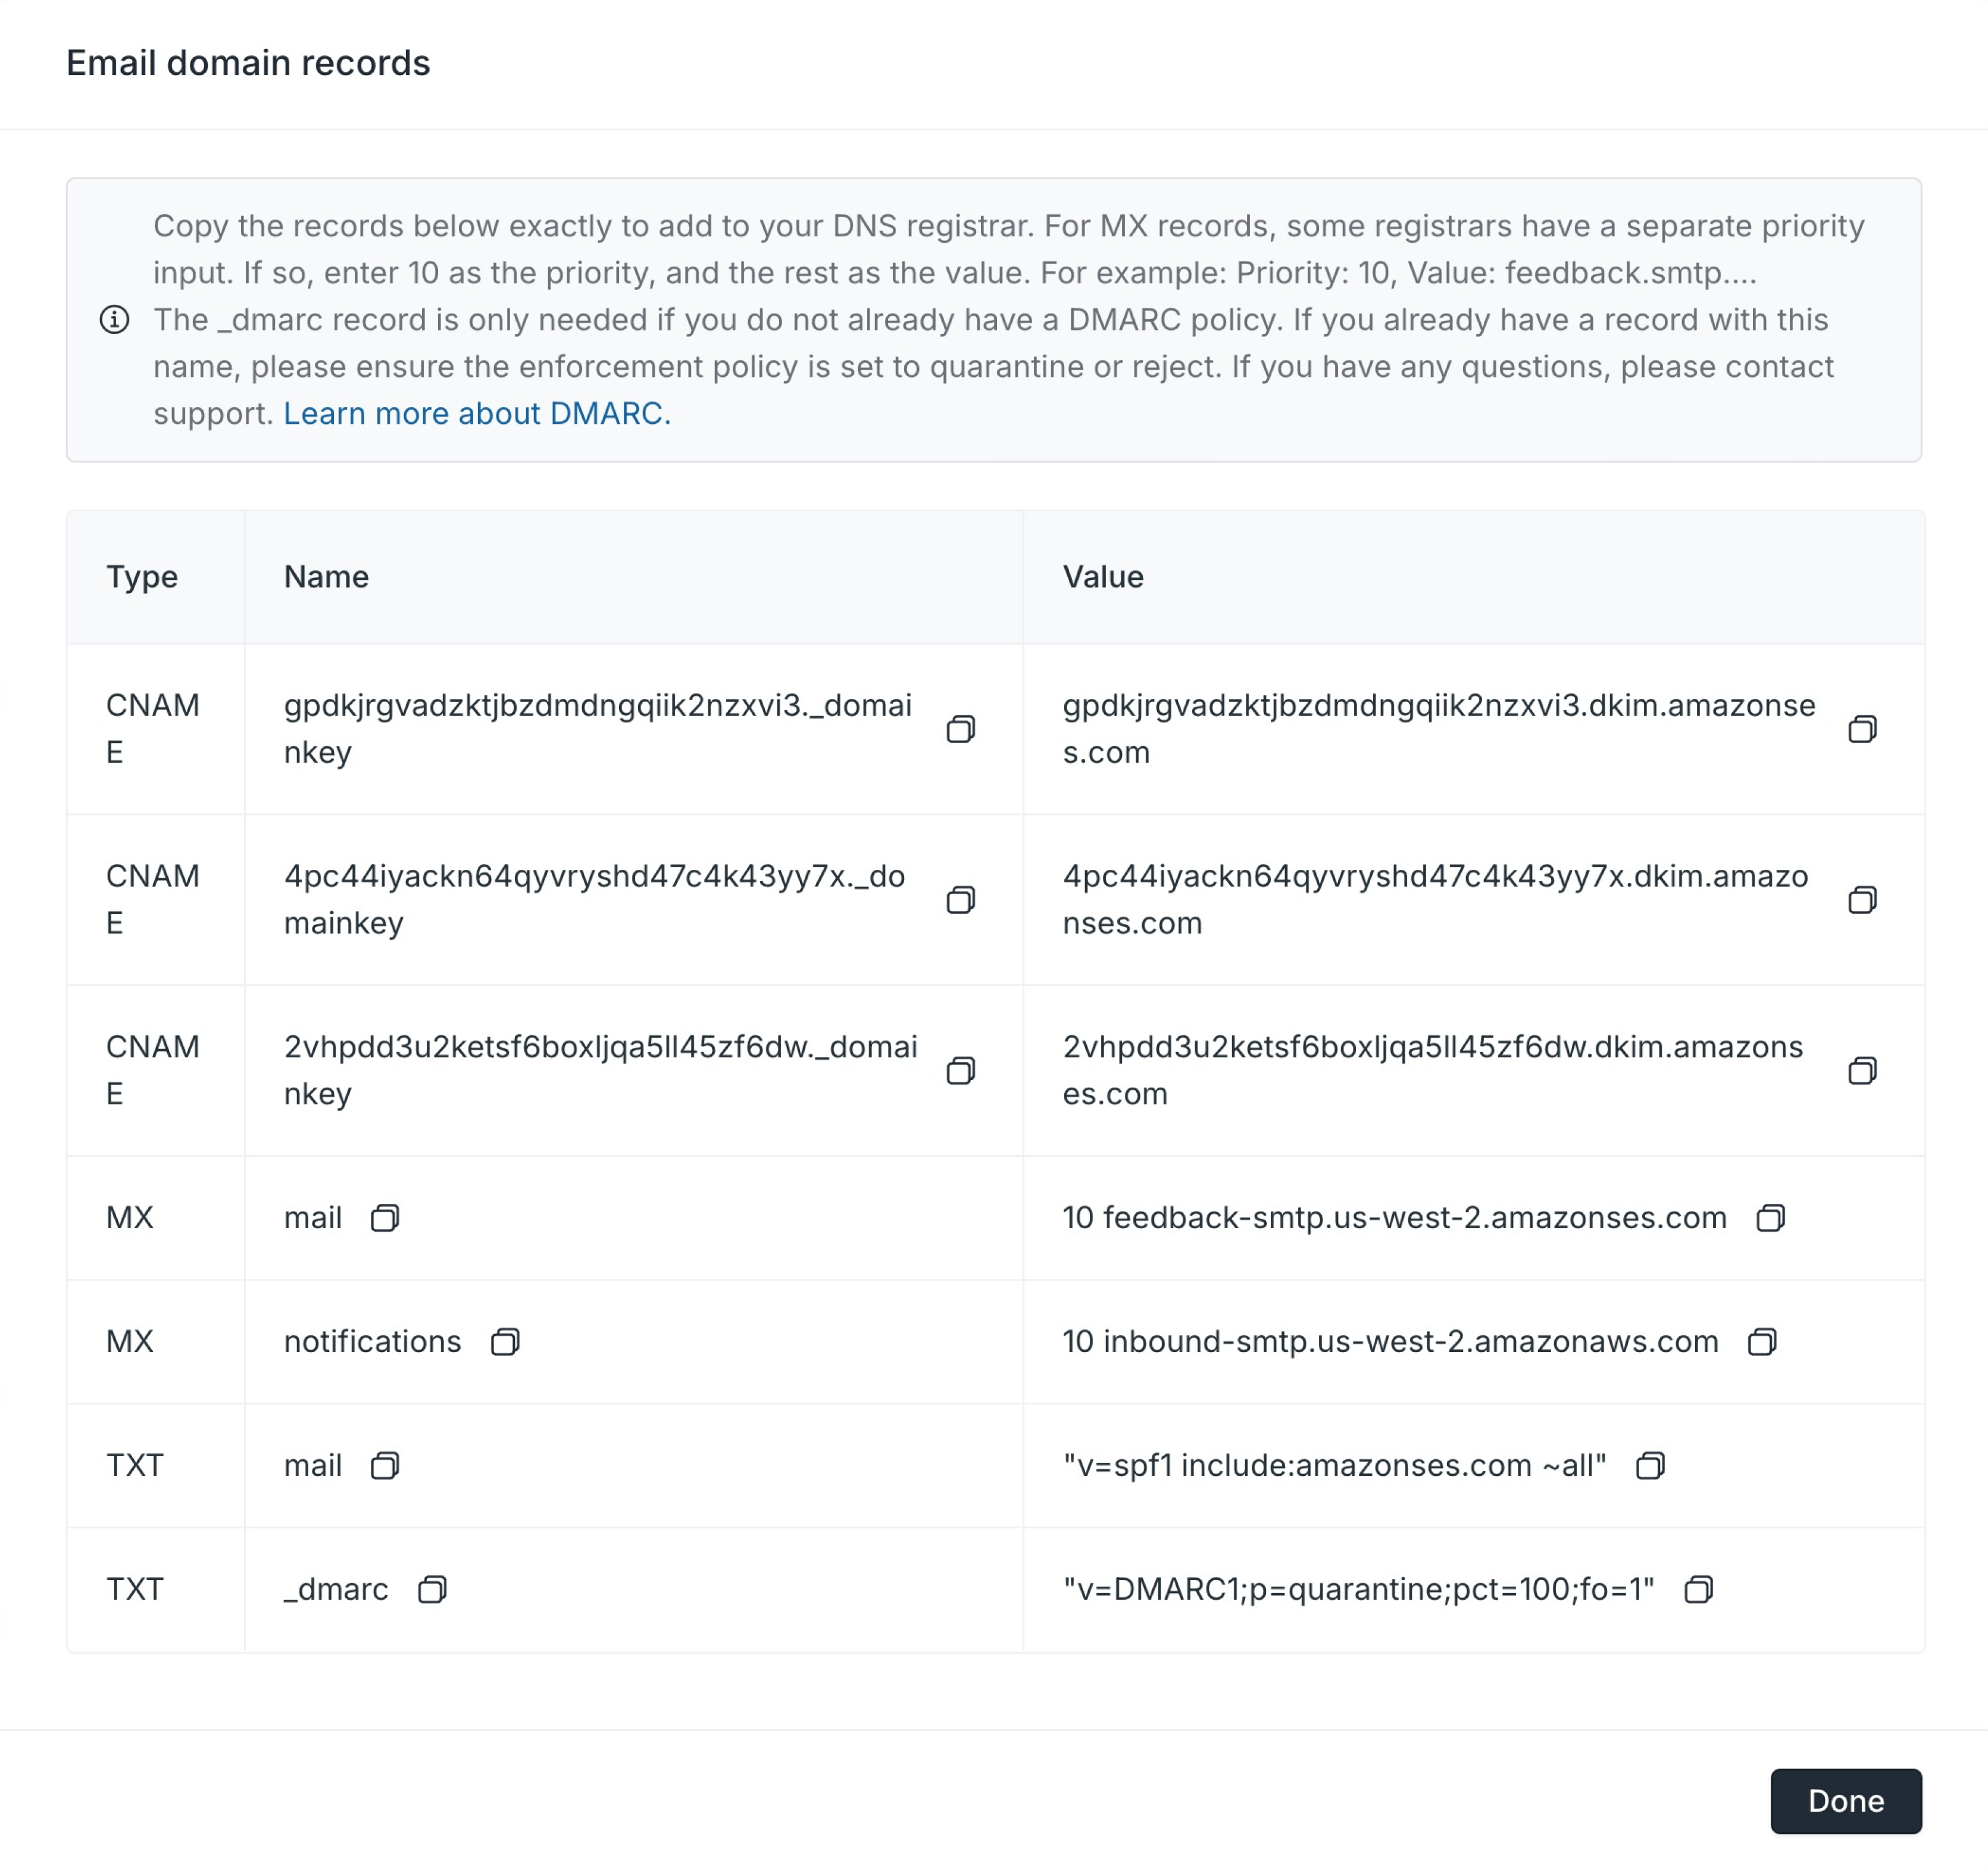
Ensure you have entered your records into your registrar
After setting up the custom email domain in Assembly, you need to input the records provided by Assembly into your registrar (the site that hosts your business’s domain). Make sure the records you enter match those provided in Assembly. Discrepancies between these records can prevent your custom domain from verifying. Please ensure you have added the following into your registrar correctly:- 3 CNAME records
- 2 MX records
- 2 TXT records
feedback.smtp… or inbound.smtp…).
The Name column shown in Assembly may also be called Host, Host Name, or Alias, depending on your DNS registrar. Similarly, the Value column is sometimes referred to as Data.
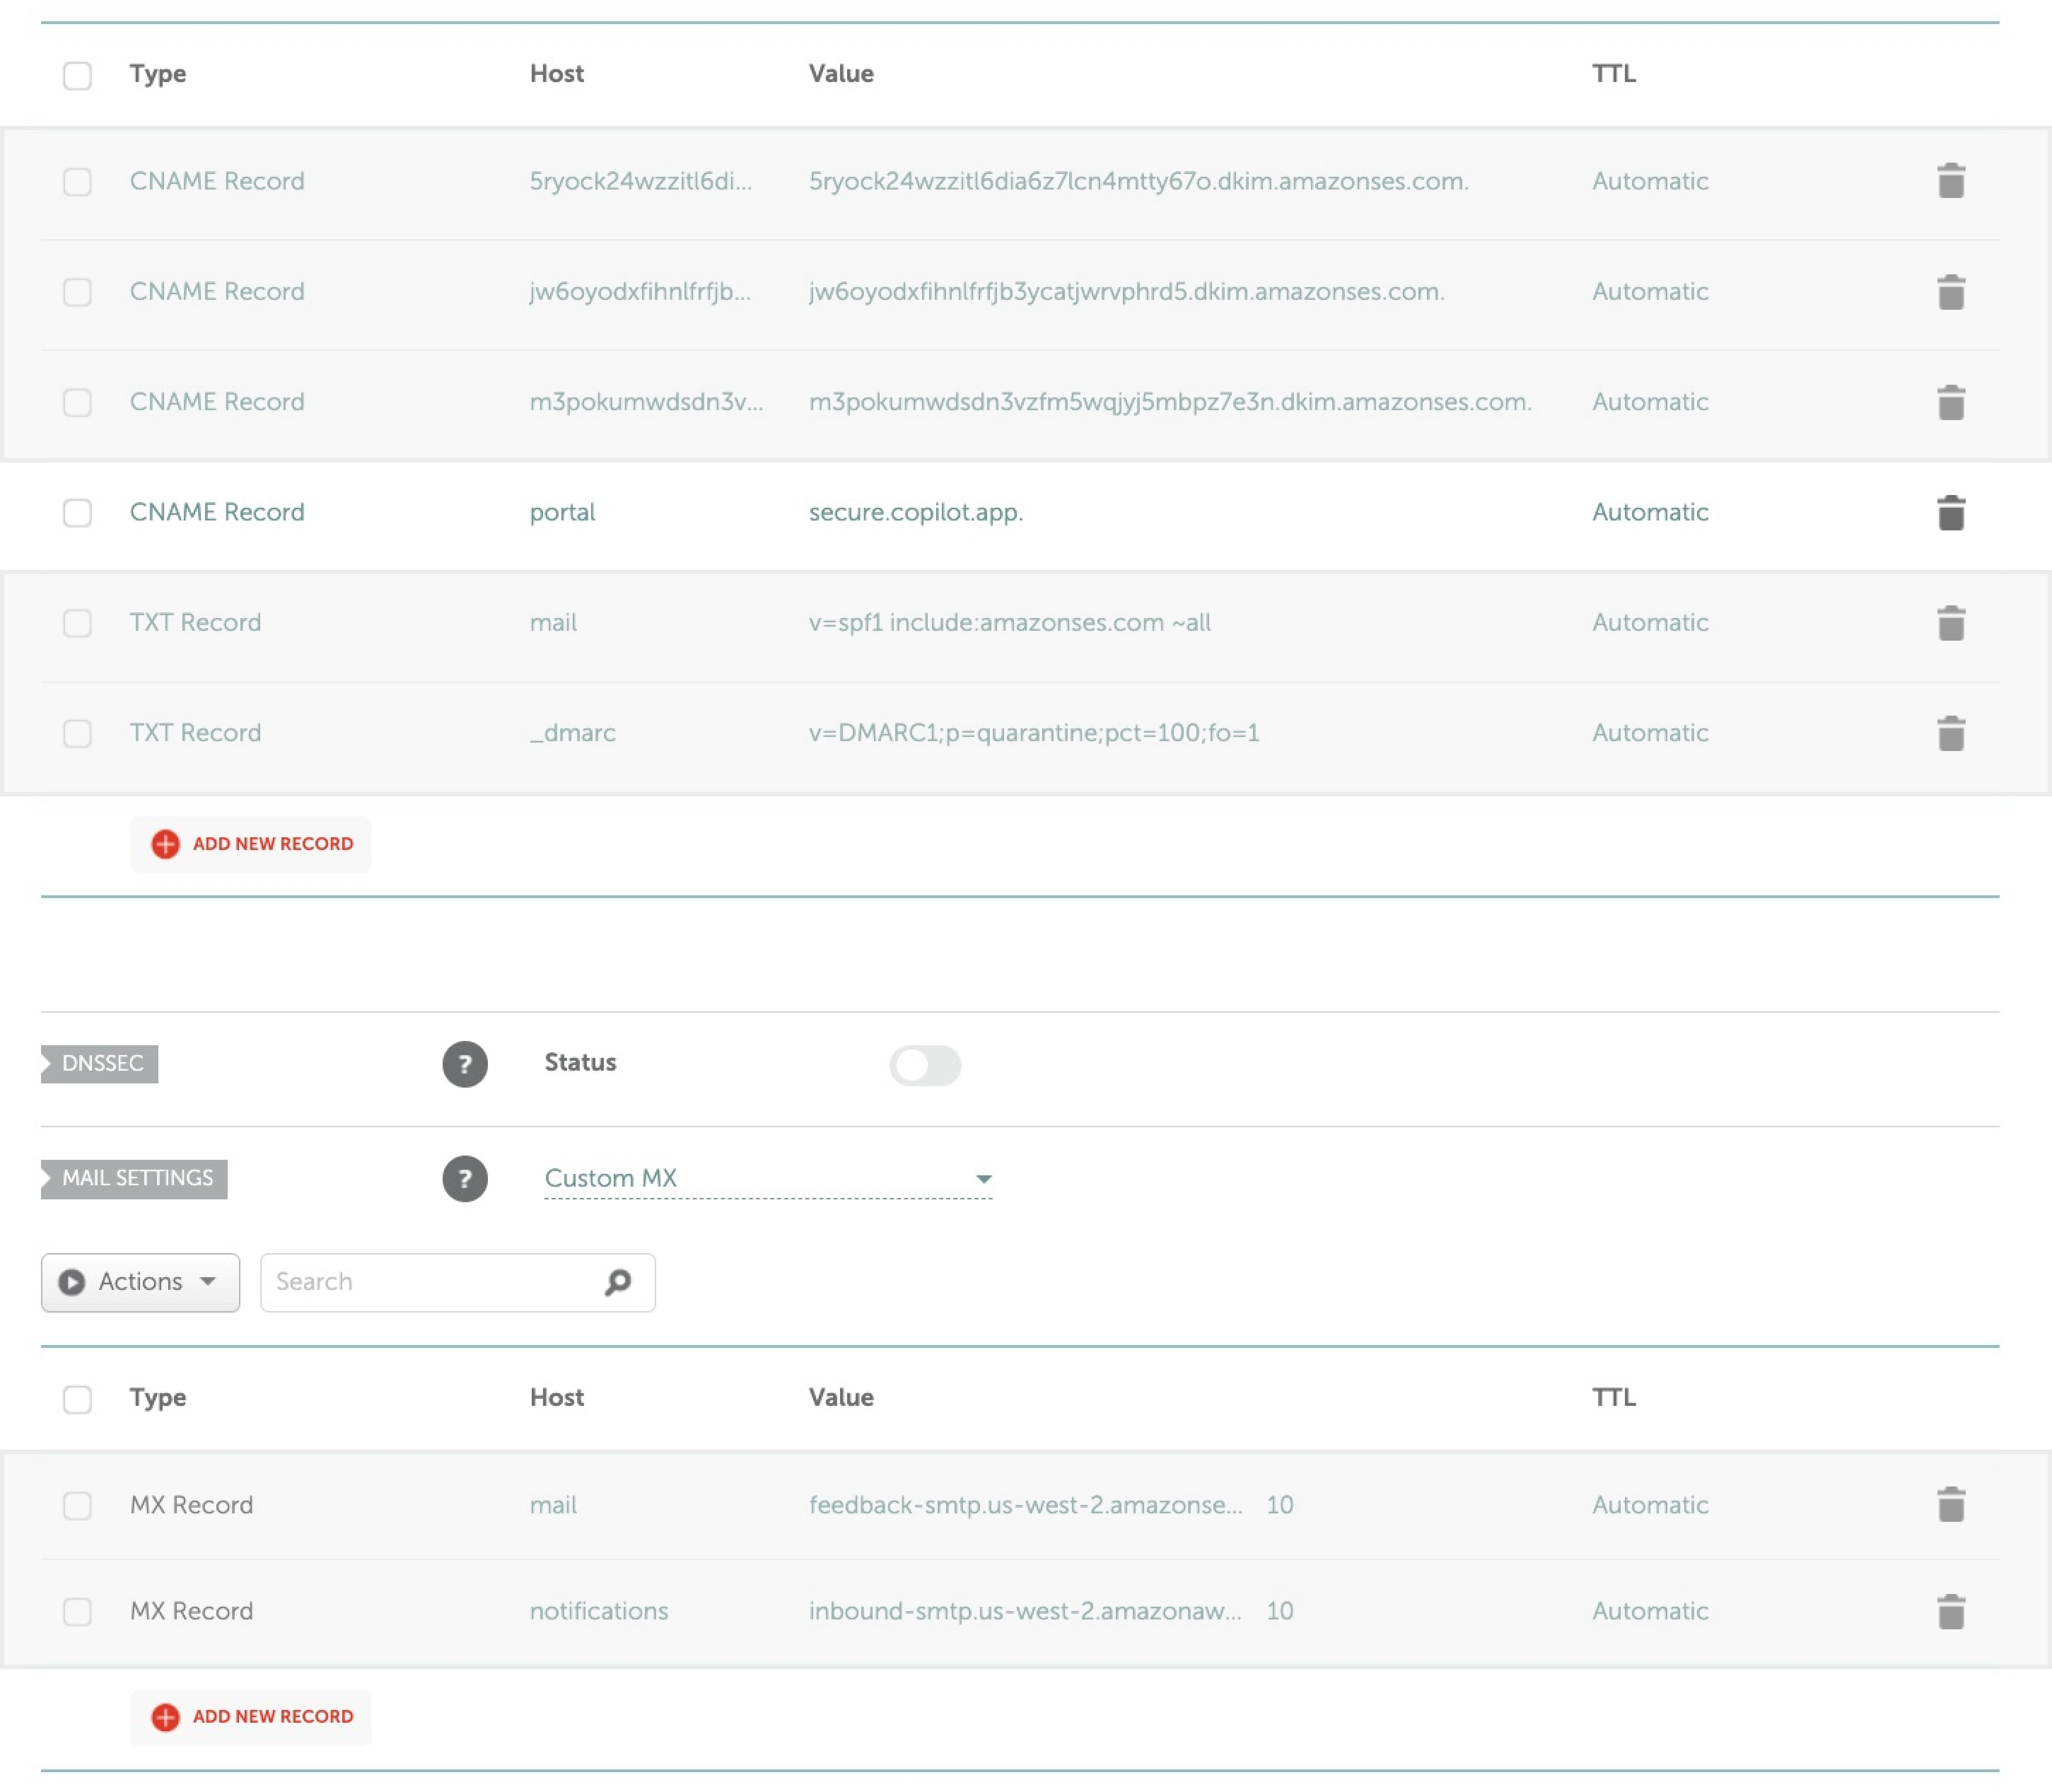
The registrar in this example is namecheap.com. Other registrars may look slightly different, but the process is generally the same.